If the last home workout thing you bought is currently living under your bed, resistance bands for home gym are either the answer or the next item in that collection — here’s how to tell which.
The honest version: most home fitness routines don’t fail because the person lacks discipline. They fail because the routine wasn’t built for a real apartment — a 6×8 rug, 20 minutes between meetings, no room to swing anything heavy.
A single full-length loop band takes up less space than a water bottle and handles the rows, presses, squats, and hinges in this guide. A mini loop is an optional add-on for glute work, not the same tool. You don’t need a pull-up bar or more than a few square feet of cleared floor. For the full picture beyond bands, our small-space workout guide covers the other approaches worth considering.
Some links in this article are affiliate links, including Amazon links. As an Amazon Associate, I earn from qualifying purchases at no extra cost to you. Learn more.
Table of Contents
- What You Actually Need
- Find Your Starting Resistance
- The 30-Minute Full-Body Resistance Band Workout
- The 15-Minute Express Version
- How to Progress Without Buying More Bands
- Anchoring in a Rental
- Frequently Asked Questions
What You Actually Need
For the complete resistance bands for home gym workout below, start with full-length loop bands — often called power or pull-up bands. Three useful levels cover most people: light (around 10–20 lb), medium (25–35 lb), and heavy (40–55 lb). Many sets include four or five bands; the extra levels simply give you smaller progression steps.
Mini loops are a separate category. They sit around the thighs for glute bridges, lateral walks, and hip abductions, but they are too short for the seated rows, Romanian deadlifts, and overhead presses in this guide. Fabric mini bands are worth adding if your training is lower-body heavy or latex rolls on your legs.
Tube bands with handles are another workable option, but they make more sense once you want handle-based or door-anchored variations.
If you’re weighing up bands vs dumbbells for a small flat: bands win on space, cost, and versatility for a first purchase. If you already own adjustable dumbbells and they’re working, bands complement what you have rather than replace them.
Here’s the practical breakdown:
| Type | Best For | Resistance Range | Honest Trade-off |
|---|---|---|---|
| Full-length loop / power bands | Full-body — squats, rows, presses, hinges, core | Light to very heavy | Best single system for this workout; thicker levels can be demanding for beginners |
| Mini loop bands (latex or fabric) | Lower body — glute bridges, lateral walks, hip abductions | Extra light to heavy | Compact and useful, but too short for most full-body pulling and pressing |
| Tube bands with handles | Rows, chest press, curls — moves needing a grip | Medium to heavy | Comfortable handles, but more pieces and anchoring choices to manage |
For the complete routine: buy full-length loops first. A set with several labelled levels lets you use lighter resistance for presses and pull-aparts, then move heavier for squats and hinges. True beginners may prefer one light band before committing to a set whose lightest level starts around medium resistance.
Buying one set for the full routine? Gymreapers Resistance Bands give you five labelled full-length levels.
They cover squats, rows, deadlifts, presses, and anchored work. Because the lightest band is rated 20–35 lb, complete beginners may be better starting with one lighter band.
Find Your Starting Resistance
Two quick answers will match you with a starting resistance for a full-length loop band.
Question 1 of 2How many bodyweight squats can you do in a row with good form?
The 30-Minute Full-Body Resistance Band Workout
This workout uses a full-length loop resistance band: light for pull-aparts and shoulder work, medium for rows and presses, and heavier resistance for squats or hinges when available. A mini loop is optional for the glute warm-up and finisher. It fits on a 6×6 ft rug, needs no jumping, and requires no door anchor for the main circuit.
How to read the plan: Each exercise shows sets × reps and the one cue that matters most. Not a paragraph of instructions — just the thing that changes the result if you get it right.
Warm-Up — 5 Minutes
- Glute bridge hold: Lie on your back with feet flat and drive your hips up, holding 2 seconds at the top. 2 × 10. Add a mini loop above the knees if you own one. Cue: keep your ribs down and finish by squeezing the glutes, not arching your lower back.
- Banded pull-apart: Hold band in both hands at chest height, arms straight. Pull hands apart until band touches your chest. 2 × 12. Cue: squeeze your shoulder blades together at the end, don’t just flap your arms out.
- Bodyweight squat: No band. 1 × 15. Just waking up the movement pattern.
Main Circuit — 4 Rounds
Rest 45–60 seconds between exercises. Rest 90 seconds between rounds. Complete all 5 exercises before the longer rest.
-
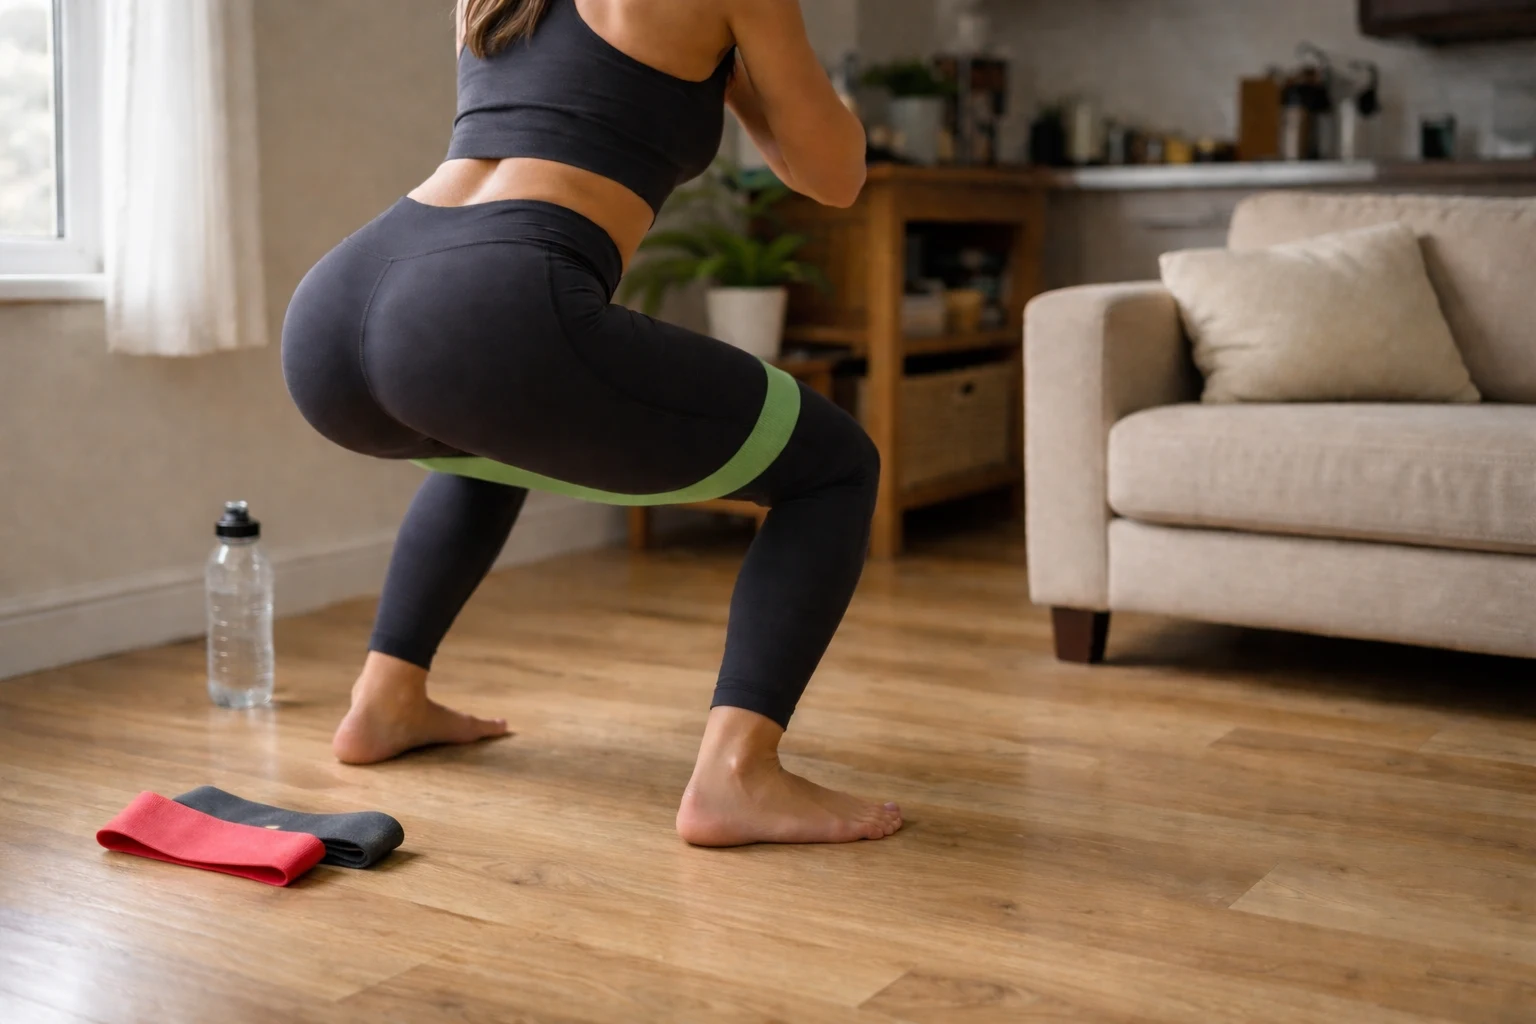
Banded squat — lower body, push pattern
Stand on the middle of a full-length loop with feet shoulder-width. Bring the upper part across your shoulders and hold it near collarbone height. Squat until thighs are parallel or as low as your form allows. 3 × 10–12.
Cue: keep your ribs stacked and knees tracking over your second toe as you stand against the rising band tension. -
Banded row — upper back, pull pattern
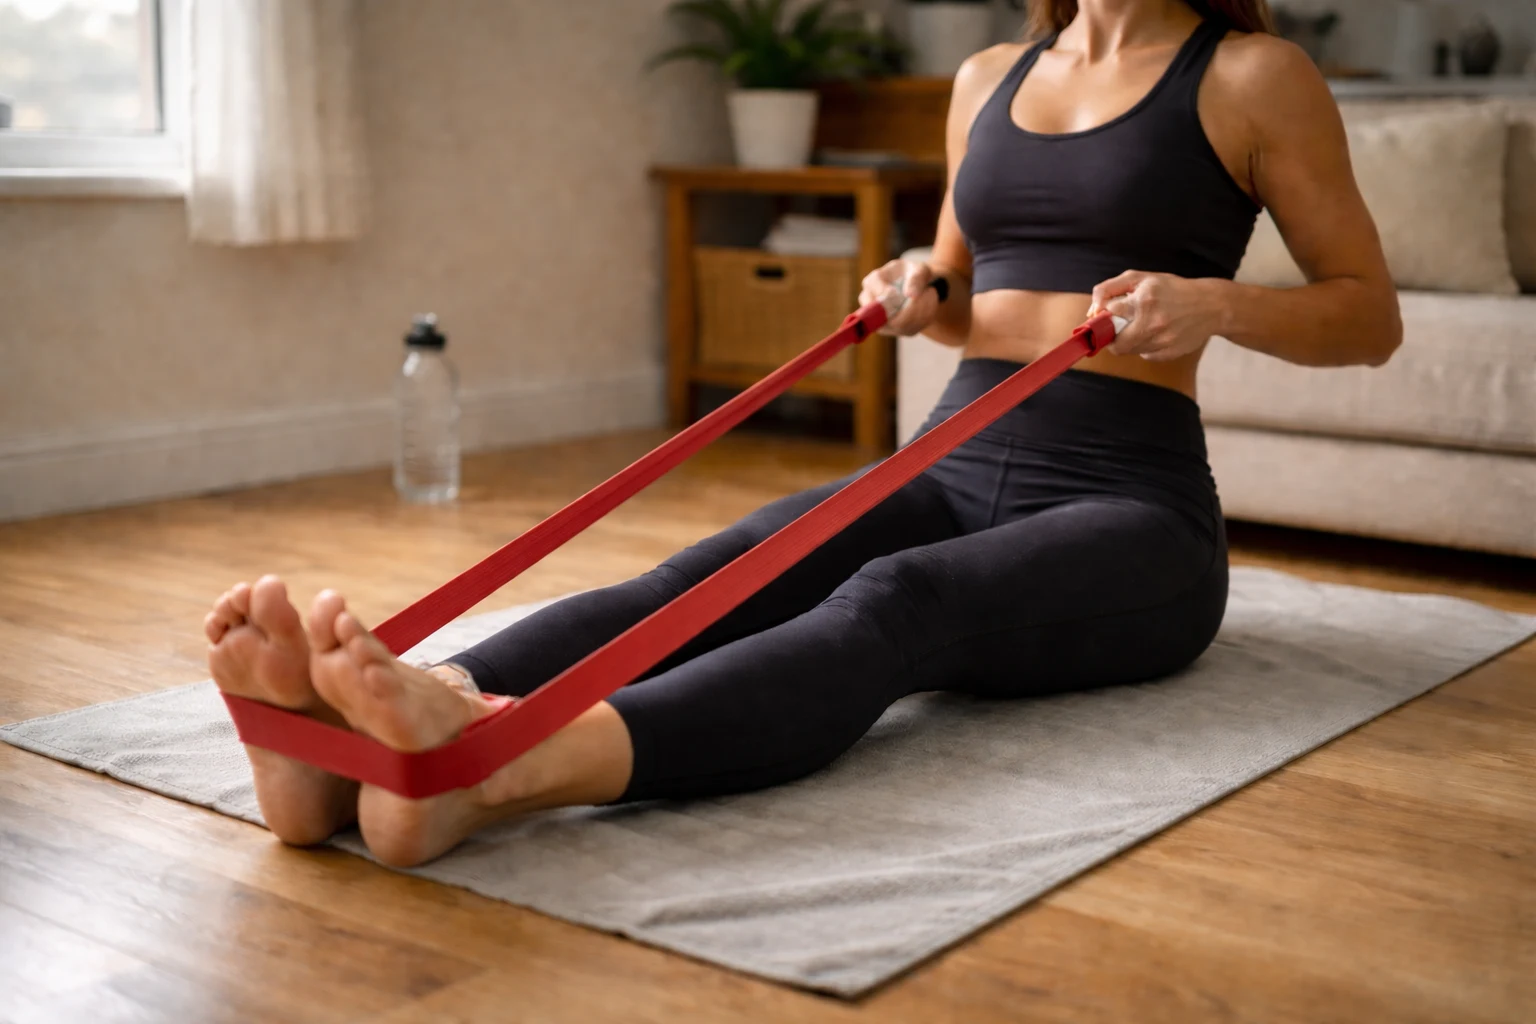
Sit on the floor, legs straight, band looped around both feet, one end in each hand. Hinge back slightly from the hips, keep your back straight. Pull hands toward your lower ribs. 3 × 10–12.
Cue: lead the pull with your elbows, not your hands — think of your elbows grazing your ribs as they come back. -
Banded Romanian deadlift — posterior chain, hinge pattern
Stand on the band with feet hip-width, hold the other end at thigh height with both hands. Hinge at the hips, letting the band stretch as your torso lowers until you feel a pull in your hamstrings. Drive hips forward to stand. 3 × 10.
Cue: this is a hinge, not a squat — knees have a slight bend but mostly stay still. If your lower back rounds, you’ve gone too far. -
Banded overhead press — shoulders, push pattern
Stand on the band with feet shoulder-width, hold ends at shoulder height, palms facing forward. Press overhead until arms are fully extended. Lower with control. Use your light band here — shoulders fatigue faster than most people expect. 3 × 10–12.
Cue: don’t let your lower back arch at the top. Keep your ribcage down as you press overhead. -
Banded pallof press — core, anti-rotation
This one’s less familiar than the others but worth learning — it builds the stability that makes every other exercise stronger. Anchor the band at about chest height — a door handle, a sturdy shelf bracket, or the top of a heavy chair back all work. Stand sideways to the anchor, band held at your chest. Press hands straight out, hold 2 seconds, return. 3 × 8 each side.
Cue: the goal is to not rotate. Your core is resisting the pull, not moving with it. If it feels easy, step one step further from the anchor.
Finisher — 5 Minutes
- Glute bridge: 2 × 15, bodyweight or with a mini loop above the knees. Higher rep, lighter effort — the goal is to finish the glutes after the compound work.
- Banded bicep curl: Stand on band, curl both hands to shoulders. 2 × 12. Control the lowering phase — that’s where half the work happens.
If glute-focused work is the part you repeat most, a fabric mini band solves the main practical annoyance: rolling during higher-rep sets.
For glute-focused sessions, Gymreapers Hip Bands stay put better than latex mini loops.
Useful for glute bridges, lateral walks, and hip abductions. They complement the full-length bands rather than replace them.
The 15-Minute Express Version
For the days when 30 minutes doesn’t exist. This is a real training session, not a backup plan — one medium full-length loop band, done in 15 minutes flat. Three rounds, no rest between exercises, 60 seconds rest between rounds.
| Exercise | Sets × Reps | Key Cue |
|---|---|---|
| Banded squat | 3 × 10 | Band across shoulders, ribs down |
| Banded row (seated) | 3 × 10 | Elbows back, not hands |
| Banded Romanian deadlift | 3 × 10 | Hips back, neutral spine |
| Banded overhead press | 3 × 10 | Ribcage down throughout |
| Banded pull-apart | 3 × 12 | Shoulder blades squeeze at end |
If this is the format that fits your schedule, our 15-minute resistance band workout has more exercise variations and a full 4-week progression built around it.
How to Progress Without Buying More Bands
The most common mistake with band training: hitting a plateau and immediately assuming you need a heavier band. Most of the time, you don’t — not yet.
Here’s the progression ladder, in order — work through each step before deciding you need a heavier band. In practice, most people find they can add 6–8 weeks of progress before an upgrade is genuinely necessary:
- Increase reps first. If the plan calls for 10–12, push to 15 with the same band and same form before considering a heavier option.
- Slow the tempo. A 3-second eccentric (lowering phase) on a squat or row makes a medium band feel considerably heavier. This is the most underused progression tool in band training — and it costs nothing.
- Add a pause. Hold the peak contraction for 2–3 seconds. A banded row held at the end position — most people rush this — builds more than a fast-paced set with a heavier band.
- Stack bands. Loop two bands together for compound exercises. If you’re using fabric resistance bands on lower body moves, adding a light loop band on top gives you extra resistance without buying a new level.
- Move up a level. If you’ve genuinely exhausted the above and you’re completing all sets at 15+ reps with solid form, it’s time for the next band.
Once you’ve mastered progression with the bands you already own, the next practical question for apartment dwellers is where to anchor them without damaging anything.
Anchoring in a Rental
Most resistance band anchoring advice assumes you can drill a wall or use a door that swings toward you with space behind it. In practice, in a rented flat, neither is reliably true.
These alternatives work without damaging anything:
- Foot anchor: Standing or seated on the band itself covers squats, deadlifts, overhead press, and curls — no wall, no door required. All five main exercises in this guide use this method.
- Table or chair leg: Loop the band around a leg of a heavy piece of furniture. Works for rows, chest flyes, and tricep work. Test stability before loading hard.
- Purpose-built door anchor: Place it on the hinge or jamb side of a sturdy door that closes firmly. Pull in the same direction the door closes and test the setup with light tension before a working set.
- Sofa base: Tuck the band under the sofa frame and pull outward — works for light pulling exercises. Pull outward, not upward, to keep the frame stable.
Of these, the foot anchor is the most reliable for most people — it’s available on every exercise in this guide, needs no setup, and works in any rental without touching the walls or furniture.
Foot anchoring is enough for the core routine. A door anchor becomes useful only when you want more exercise angles.
Add more rows and presses without drilling: Serious Steel Door Anchor.
A compact later-stage add-on that expands row, press, and Pallof-press setups without permanent installation. It is not required for the core routine.
If bands are becoming one part of a broader setup, the small-space home gym essentials guide compares the compact upgrades that genuinely earn their space in a flat.
Frequently Asked Questions
Conclusion
Using resistance bands for home gym training works best when the routine fits your real constraints — limited floor space, limited time, and no fixtures to drill into. Start with one medium full-length loop band, run the 30-minute session three times a week, and add a lighter or heavier level only when the exercises call for it.
A resistance band set with three useful levels covers the routine, while a mini loop remains an optional lower-body accessory. Progress with reps, then tempo, then band stacking before buying more equipment.
When bands no longer provide the load you need, adjustable dumbbells built for apartment storage are the next compact step.
Buff Fitness publishes general fitness information only. Individual results vary. If you have an injury, medical condition, or health concern, consult a qualified professional before starting any exercise programme.